Tutorials
Tutorial 1: Finetuning Models
This tutorial provides instructions for users to use the pre-trained models to finetune them on other datasets, so that better performance can be get.
There are two steps to finetune a model on a new dataset.
Add support for the new dataset. See Tutorial 2: Adding New Dataset.
Modify the configs. This will be discussed in this tutorial.
For example, if the user want to finetune models pre-trained on Kinetics-400 Dataset to another dataset, say UCF101, then four parts in the config (see here) needs attention.
Modify Head
The num_classes in the cls_head need to be changed to the class number of the new dataset.
The weights of the pre-trained models are reused except for the final prediction layer.
So it is safe to change the class number.
In our case, UCF101 has 101 classes.
So we change it from 400 (class number of Kinetics-400) to 101.
model = dict(
    type='Recognizer2D',
    backbone=dict(
        type='ResNet',
        pretrained='torchvision://resnet50',
        depth=50,
        norm_eval=False),
    cls_head=dict(
        type='TSNHead',
        num_classes=101,   ## change from 400 to 101
        in_channels=2048,
        spatial_type='avg',
        consensus=dict(type='AvgConsensus', dim=1),
        dropout_ratio=0.4,
        init_std=0.01))
Note that the pretrained='torchvision://resnet50' setting is used for initializing backbone.
If you are training a new model from ImageNet-pretrained weights, this is for you.
However, this setting is not related to our task at hand.
What we need is load_from, which will be discussed later.
Modify Dataset
MMAction2 supports UCF101, Kinetics-400, Moments in Time, Multi-Moments in Time, THUMOS14,
Something-Something V1&V2, ActivityNet Dataset.
The users may need to adapt one of the above dataset to fit for their special datasets.
In our case, UCF101 is already supported by various dataset types, like RawframeDataset,
so we change the config as follows.
## dataset settings
dataset_type = 'RawframeDataset'
data_root = 'data/ucf101/rawframes_train/'
data_root_val = 'data/ucf101/rawframes_val/'
ann_file_train = 'data/ucf101/ucf101_train_list.txt'
ann_file_val = 'data/ucf101/ucf101_val_list.txt'
ann_file_test = 'data/ucf101/ucf101_val_list.txt'
Modify Training Schedule
Finetuning usually requires smaller learning rate and less training epochs.
## optimizer
optimizer = dict(type='SGD', lr=0.005, momentum=0.9, weight_decay=0.0001)  ## change from 0.01 to 0.005
optimizer_config = dict(grad_clip=dict(max_norm=40, norm_type=2))
## learning policy
lr_config = dict(policy='step', step=[40, 80])
total_epochs = 50 ## change from 100 to 50
checkpoint_config = dict(interval=5)
Use Pre-Trained Model
To use the pre-trained model for the whole network, the new config adds the link of pre-trained models in the load_from.
## use the pre-trained model for the whole TSN network
load_from = 'https://open-mmlab.s3.ap-northeast-2.amazonaws.com/mmaction/mmaction-v1/recognition/tsn_r50_1x1x3_100e_kinetics400_rgb/tsn_r50_1x1x3_100e_kinetics400_rgb_20200614-e508be42.pth'  ## model path can be found in model zoo
Tutorial 2: Adding New Dataset
Customize Datasets by Reorganizing Data
Reorganize datasets to existing format
The simplest way is to convert your dataset to existing dataset formats (RawframeDataset or VideoDataset).
There are three kinds of annotation files.
rawframe annotation
The annotation of a rawframe dataset is a text file with multiple lines, and each line indicates
frame_directory(relative path) of a video,total_framesof a video and thelabelof a video, which are split by a whitespace.Here is an example.
some/directory-1 163 1
some/directory-2 122 1
some/directory-3 258 2
some/directory-4 234 2
some/directory-5 295 3
some/directory-6 121 3
video annotation
The annotation of a video dataset is a text file with multiple lines, and each line indicates a sample video with the
filepath(relative path) andlabel, which are split by a whitespace.Here is an example.
some/path/000.mp4 1
some/path/001.mp4 1
some/path/002.mp4 2
some/path/003.mp4 2
some/path/004.mp4 3
some/path/005.mp4 3
ActivityNet annotation The annotation of ActivityNet dataset is a json file. Each key is a video name and the corresponding value is the meta data and annotation for the video.
Here is an example.
{
  "video1": {
      "duration_second": 211.53,
      "duration_frame": 6337,
      "annotations": [
          {
              "segment": [
                  30.025882995319815,
                  205.2318595943838
              ],
              "label": "Rock climbing"
          }
      ],
      "feature_frame": 6336,
      "fps": 30.0,
      "rfps": 29.9579255898
  },
  "video2": {
      "duration_second": 26.75,
      "duration_frame": 647,
      "annotations": [
          {
              "segment": [
                  2.578755070202808,
                  24.914101404056165
              ],
              "label": "Drinking beer"
          }
      ],
      "feature_frame": 624,
      "fps": 24.0,
      "rfps": 24.1869158879
  }
}
There are two ways to work with custom datasets.
online conversion
You can write a new Dataset class inherited from BaseDataset, and overwrite three methods
load_annotations(self),evaluate(self, results, metrics, logger)anddump_results(self, results, out), like RawframeDataset, VideoDataset or ActivityNetDataset.offline conversion
You can convert the annotation format to the expected format above and save it to a pickle or json file, then you can simply use
RawframeDataset,VideoDatasetorActivityNetDataset.
After the data pre-processing, the users need to further modify the config files to use the dataset. Here is an example of using a custom dataset in rawframe format.
In configs/task/method/my_custom_config.py:
...
## dataset settings
dataset_type = 'RawframeDataset'
data_root = 'path/to/your/root'
data_root_val = 'path/to/your/root_val'
ann_file_train = 'data/custom/custom_train_list.txt'
ann_file_val = 'data/custom/custom_val_list.txt'
ann_file_test = 'data/custom/custom_val_list.txt'
...
data = dict(
    videos_per_gpu=32,
    workers_per_gpu=4,
    train=dict(
        type=dataset_type,
        ann_file=ann_file_train,
        ...),
    val=dict(
        type=dataset_type,
        ann_file=ann_file_val,
        ...),
    test=dict(
        type=dataset_type,
        ann_file=ann_file_test,
        ...))
...
We use this way to support Rawframe dataset.
An example of a custom dataset
Assume the annotation is in a new format in text files, and the image file name is of template like img_00005.jpg
The video annotations are stored in text file annotation.txt as following
directory,total frames,class
D32_1gwq35E,299,66
-G-5CJ0JkKY,249,254
T4h1bvOd9DA,299,33
4uZ27ivBl00,299,341
0LfESFkfBSw,249,186
-YIsNpBEx6c,299,169
We can create a new dataset in mmaction/datasets/my_dataset.py to load the data.
import copy
import os.path as osp

import mmcv

from .base import BaseDatset
from .registry import DATASETS


@DATASETS.register_module()
class MyDataset(BaseDatset):

    def __init__(self,
                 ann_file,
                 pipeline,
                 data_prefix=None,
                 test_mode=False,
                 filename_tmpl='img_{:05}.jpg'):
        super(MyDataset, self).__init__(ann_file, pipeline, test_mode)

        self.filename_tmpl = filename_tmpl

    def load_annotations(self):
        video_infos = []
        with open(self.ann_file, 'r') as fin:
            for line in fin:
                if line.startswith("directory"):
                    continue
                frame_dir, total_frames, label = line.split(',')
                if self.data_prefix is not None:
                    frame_dir = osp.join(self.data_prefix, frame_dir)
                video_infos.append(
                    dict(
                        frame_dir=frame_dir,
                        total_frames=int(total_frames),
                        label=int(label)))
        return video_infos

    def prepare_train_frames(self, idx):
        results = copy.deepcopy(self.video_infos[idx])
        results['filename_tmpl'] = self.filename_tmpl
        return self.pipeline(results)

    def prepare_test_frames(self, idx):
        results = copy.deepcopy(self.video_infos[idx])
        results['filename_tmpl'] = self.filename_tmpl
        return self.pipeline(results)

    def evaluate(self,
                 results,
                 metrics='top_k_accuracy',
                 topk=(1, 5),
                 logger=None):
        pass
Then in the config, to use MyDataset you can modify the config as the following
dataset_A_train = dict(
    type='MyDataset',
    ann_file = ann_file_train,
    pipeline=train_pipeline
)
Customize Dataset by Mixing Dataset
MMAction2 also supports to mix dataset for training. Currently it supports to repeat dataset.
Repeat dataset
We use RepeatDataset as wrapper to repeat the dataset. For example, suppose the original dataset as Dataset_A,
to repeat it, the config looks like the following
dataset_A_train = dict(
        type='RepeatDataset',
        times=N,
        dataset=dict(  ## This is the original config of Dataset_A
            type='Dataset_A',
            ...
            pipeline=train_pipeline
        )
    )
Tutorial 3: Custom Data Pipelines
Design of Data Pipelines
Following typical conventions, we use Dataset and DataLoader for data loading
with multiple workers. Dataset returns a dict of data items corresponding
the arguments of models’ forward method.
Since the data in action recognition & localization may not be the same size (image size, gt bbox size, etc.),
The DataContainer in MMCV is used to help collect and distribute data of different sizes.
See here for more details.
The data preparation pipeline and the dataset is decomposed. Usually a dataset defines how to process the annotations and a data pipeline defines all the steps to prepare a data dict. A pipeline consists of a sequence of operations. Each operation takes a dict as input and also output a dict for the next operation.
We present a typical pipeline in the following figure. The blue blocks are pipeline operations.
With the pipeline going on, each operator can add new keys (marked as green) to the result dict or update the existing keys (marked as orange).
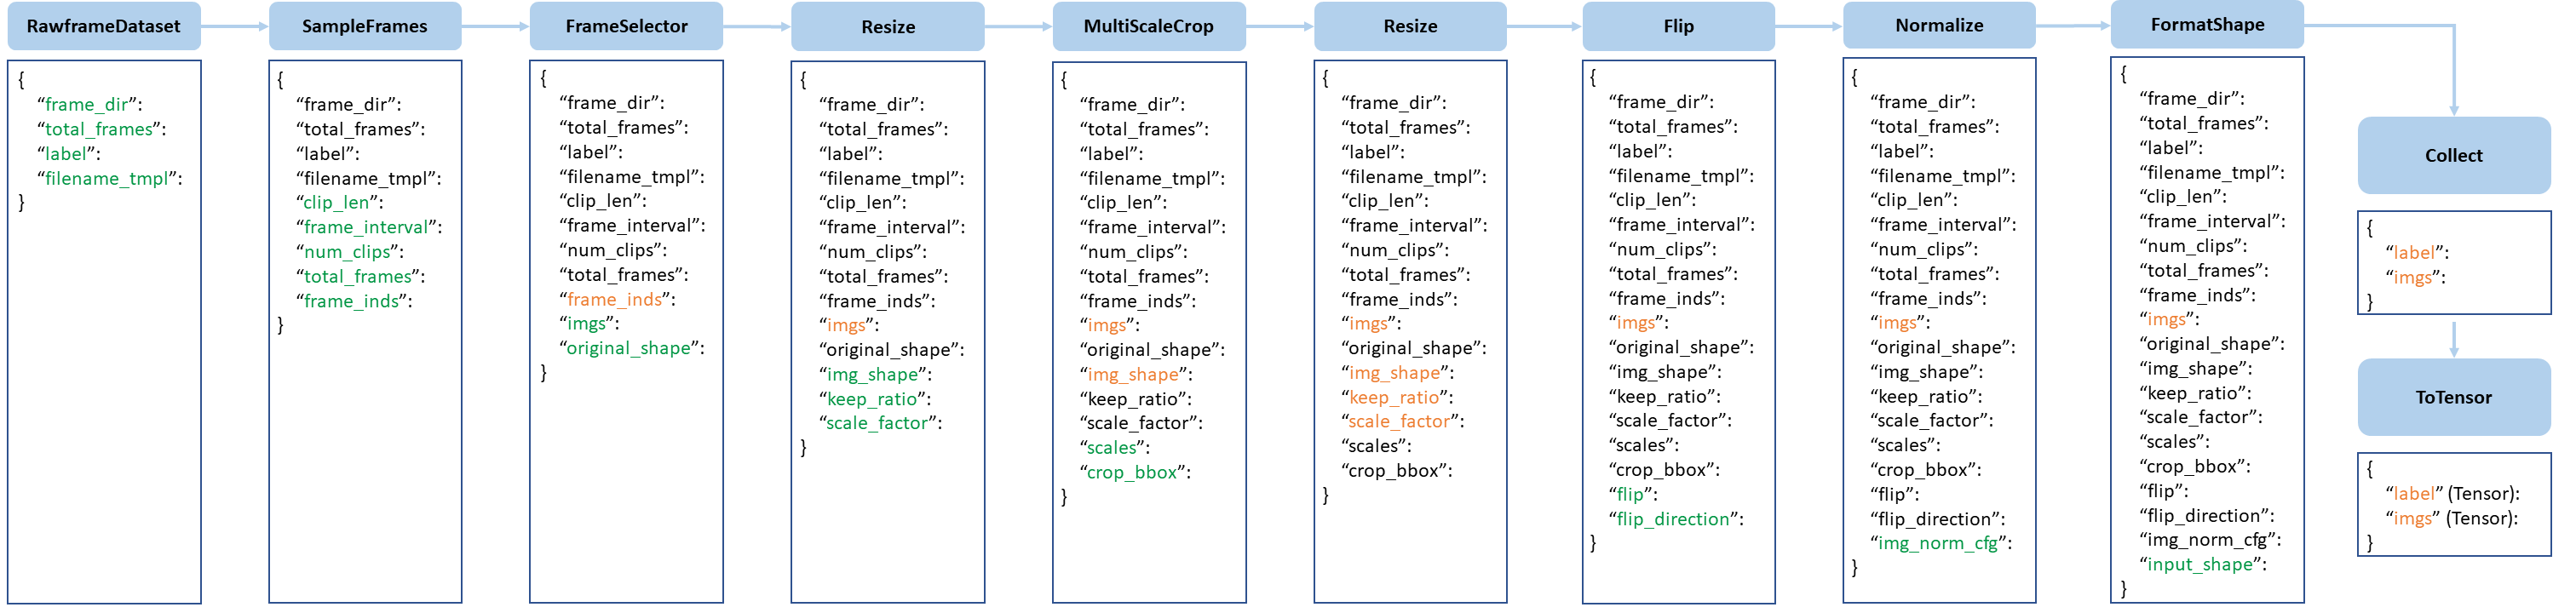 pipeline figure
The operations are categorized into data loading, pre-processing and formatting.
Here is a pipeline example for TSN.
img_norm_cfg = dict(
    mean=[123.675, 116.28, 103.53], std=[58.395, 57.12, 57.375], to_bgr=False)
train_pipeline = [
    dict(type='SampleFrames', clip_len=1, frame_interval=1, num_clips=3),
    dict(type='RawFrameDecode', io_backend='disk'),
    dict(type='Resize', scale=(-1, 256)),
    dict(
        type='MultiScaleCrop',
        input_size=224,
        scales=(1, 0.875, 0.75, 0.66),
        random_crop=False,
        max_wh_scale_gap=1),
    dict(type='Resize', scale=(224, 224), keep_ratio=False),
    dict(type='Flip', flip_ratio=0.5),
    dict(type='Normalize', **img_norm_cfg),
    dict(type='FormatShape', input_format='NCHW'),
    dict(type='Collect', keys=['imgs', 'label'], meta_keys=[]),
    dict(type='ToTensor', keys=['imgs', 'label'])
]
val_pipeline = [
    dict(
        type='SampleFrames',
        clip_len=1,
        frame_interval=1,
        num_clips=3,
        test_mode=True),
    dict(type='RawFrameDecode', io_backend='disk'),
    dict(type='Resize', scale=(-1, 256)),
    dict(type='CenterCrop', crop_size=224),
    dict(type='Flip', flip_ratio=0),
    dict(type='Normalize', **img_norm_cfg),
    dict(type='FormatShape', input_format='NCHW'),
    dict(type='Collect', keys=['imgs', 'label'], meta_keys=[]),
    dict(type='ToTensor', keys=['imgs'])
]
test_pipeline = [
    dict(
        type='SampleFrames',
        clip_len=1,
        frame_interval=1,
        num_clips=25,
        test_mode=True),
    dict(type='RawFrameDecode', io_backend='disk'),
    dict(type='Resize', scale=(-1, 256)),
    dict(type='TenCrop', crop_size=224),
    dict(type='Flip', flip_ratio=0),
    dict(type='Normalize', **img_norm_cfg),
    dict(type='FormatShape', input_format='NCHW'),
    dict(type='Collect', keys=['imgs', 'label'], meta_keys=[]),
    dict(type='ToTensor', keys=['imgs'])
]
For each operation, we list the related dict fields that are added/updated/removed.
Data loading
SampleFrames
add: frame_inds, clip_len, frame_interval, num_clips, *total_frames
DenseSampleFrames
add: frame_inds, clip_len, frame_interval, num_clips, *total_frames
PyAVDecode
add: imgs, original_shape
update: *frame_inds
DecordDecode
add: imgs, original_shape
update: *frame_inds
OpenCVDecode
add: imgs, original_shape
update: *frame_inds
RawFrameDecode
add: imgs, original_shape
update: *frame_inds
Pre-processing
RandomCrop
add: crop_bbox, img_shape
update: imgs
RandomResizedCrop
add: crop_bbox, img_shape
update: imgs
MultiScaleCrop
add: crop_bbox, img_shape, scales
update: imgs
Resize
add: img_shape, keep_ratio, scale_factor
update: imgs
Flip
add: flip, flip_direction
update: imgs
Normalize
add: img_norm_cfg
update: imgs
CenterCrop
add: crop_bbox, img_shape
update: imgs
ThreeCrop
add: crop_bbox, img_shape
update: imgs
TenCrop
add: crop_bbox, img_shape
update: imgs
MultiGroupCrop
add: crop_bbox, img_shape
update: imgs
Formatting
ToTensor
update: specified by
keys.
ImageToTensor
update: specified by
keys.
Transpose
update: specified by
keys.
Collect
add: img_meta (the keys of img_meta is specified by
meta_keys)remove: all other keys except for those specified by
keys
It is noteworthy that the first key, commonly imgs, will be used as the main key to calculate the batch size.
FormatShape
add: input_shape
update: imgs
Extend and Use Custom Pipelines
Write a new pipeline in any file, e.g.,
my_pipeline.py. It takes a dict as input and return a dict.from mmaction.datasets import PIPELINES @PIPELINES.register_module() class MyTransform: def __call__(self, results): results['key'] = value return results
Import the new class.
from .my_pipeline import MyTransform
Use it in config files.
img_norm_cfg = dict(
     mean=[123.675, 116.28, 103.53], std=[58.395, 57.12, 57.375], to_rgb=True)
train_pipeline = [
    dict(type='DenseSampleFrames', clip_len=8, frame_interval=8, num_clips=1),
    dict(type='RawFrameDecode', io_backend='disk'),
    dict(type='MyTransform'),       ## use a custom pipeline
    dict(type='Normalize', **img_norm_cfg),
    dict(type='FormatShape', input_format='NCTHW'),
    dict(type='Collect', keys=['imgs', 'label'], meta_keys=[]),
    dict(type='ToTensor', keys=['imgs', 'label'])
]
Tutorial 4: Adding New Modules
Customize Optimizer
An example of customized optimizer is CopyOfSGD is defined in mmaction/core/optimizer/copy_of_sgd.py.
More generally, a customized optimizer could be defined as following.
Assume you want to add an optimizer named as MyOptimizer, which has arguments a, b and c.
You need to first implement the new optimizer in a file, e.g., in mmaction/core/optimizer/my_optimizer.py:
from .registry import OPTIMIZERS
from torch.optim import Optimizer

@OPTIMIZERS.register_module()
class MyOptimizer(Optimizer):

    def __init__(self, a, b, c):
Then add this module in mmaction/core/optimizer/__init__.py, thus the registry will find the new module and add it:
from .my_optimizer import MyOptimizer
Then you can use MyOptimizer in optimizer field of config files.
In the configs, the optimizers are defined by the field optimizer like the following:
optimizer = dict(type='SGD', lr=0.02, momentum=0.9, weight_decay=0.0001)
To use your own optimizer, the field can be changed as
optimizer = dict(type='MyOptimizer', a=a_value, b=b_value, c=c_value)
We already support to use all the optimizers implemented by PyTorch, and the only modification is to change the optimizer field of config files.
For example, if you want to use ADAM, though the performance will drop a lot, the modification could be as the following.
optimizer = dict(type='Adam', lr=0.0003, weight_decay=0.0001)
The users can directly set arguments following the API doc of PyTorch.
Customize Optimizer Constructor
Some models may have some parameter-specific settings for optimization, e.g. weight decay for BatchNorm layers. The users can do those fine-grained parameter tuning through customizing optimizer constructor.
You can write a new optimizer constructor inherit from DefaultOptimizerConstructor
and overwrite the add_params(self, params, module) method.
An example of customized optimizer constructor is TSMOptimizerConstructor. More generally, a customized optimizer constructor could be defined as following.
In mmaction/core/optimizer/my_optimizer_constructor.py:
from mmcv.runner import OPTIMIZER_BUILDERS, DefaultOptimizerConstructor

@OPTIMIZER_BUILDERS.register_module()
class MyOptimizerConstructor(DefaultOptimizerConstructor):
In mmaction/core/optimizer/__init__.py:
from .my_optimizer_constructor import MyOptimizerConstructor
Then you can use MyOptimizerConstructor in optimizer field of config files.
## optimizer
optimizer = dict(
    type='SGD',
    constructor='MyOptimizerConstructor',
    paramwise_cfg=dict(fc_lr5=True),
    lr=0.02,
    momentum=0.9,
    weight_decay=0.0001)
Develop New Components
We basically categorize model components into 4 types.
recognizer: the whole recognizer model pipeline, usually contains a backbone and cls_head.
backbone: usually an FCN network to extract feature maps, e.g., ResNet, BNInception.
cls_head: the component for classification task, usually contains an FC layer with some pooling layers.
localizer: the model for temporal localization task, currently available: BSN, BMN.
Add new backbones
Here we show how to develop new components with an example of TSN.
Create a new file
mmaction/models/backbones/resnet.py.import torch.nn as nn from ..registry import BACKBONES @BACKBONES.register_module() class ResNet(nn.Module): def __init__(self, arg1, arg2): pass def forward(self, x): ## should return a tuple pass def init_weights(self, pretrained=None): pass
Import the module in
mmaction/models/backbones/__init__.py.from .resnet import ResNet
Use it in your config file.
model = dict(
    ...
    backbone=dict(
        type='ResNet',
        arg1=xxx,
        arg2=xxx),
)
Add new heads
Here we show how to develop a new head with the example of TSNHead as the following.
Create a new file
mmaction/models/heads/tsn_head.py.You can write a new classification head inheriting from BaseHead, and overwrite
init_weights(self)andforward(self, x)method.from ..registry import HEADS from .base import BaseHead @HEADS.register_module() class TSNHead(BaseHead): def __init__(self, arg1, arg2): pass def forward(self, x): pass def init_weights(self): pass
Import the module in
mmaction/models/heads/__init__.pyfrom .tsn_head import TSNHead
Use it in your config file
model = dict(
    ...
    cls_head=dict(
        type='TSNHead',
        num_classes=400,
        in_channels=2048,
        arg1=xxx,
        arg2=xxx),
Add new loss
Assume you want to add a new loss as MyLoss. To add a new loss function, the users need implement it in mmaction/models/losses/my_loss.py.
import torch
import torch.nn as nn

from ..builder import LOSSES

def my_loss(pred, target):
    assert pred.size() == target.size() and target.numel() > 0
    loss = torch.abs(pred - target)
    return loss


@LOSSES.register_module()
class MyLoss(nn.Module):

    def forward(self, pred, target):
        loss = my_loss(pred, target)
        return loss
Then the users need to add it in the mmaction/models/losses/__init__.py
from .my_loss import MyLoss, my_loss
To use it, modify the loss_xxx field. Since MyLoss is for regression, we can use it for the bbox loss loss_bbox.
loss_bbox=dict(type='MyLoss'))